Peugeot Forums banner

Installing subwoofer in Peugeot 5008 2017+

139K views 195 replies 21 participants last post by  vigelisda  
#1 ·
Hi All,

I have the 5008 2017+ model which didn't have the option for a speaker upgrade (i.e. Focal option) at the Peugeot dealership in Australia like they do in Europe.
Currently it has the standard 2 front door speakers + 2 front twitters, 2 rear door speakers.

I'm planning to give it an upgrade by replacing the door speakers with a better quality speakers + installing a slimline subwoofer under the seat. Plenty of aftermarket choices from Focal for the door speakers. The subwoofer, however is a different story.
Since there is not that much space under the seat, I need to be extra careful on the selection of the subwoofer unit.

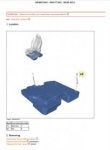
I browsed the service manual and found an interesting "bass box" compartment under the seat. It must be the space that has been allocated to allow the subwoofer upgrade.
I have a PDF snippet on this unit from the service manual but since I'm new I'm not allowed to post the link.

However, it doesn't specifically show what is the dimension of the compartment. I'm guessing this is currently empty. Very curious on what is the depth of this space is like.

Any ideas?
 

Attachments

Discussion starter · #3 ·
Bump. Any pointer on where I can find some info? Perhaps I need to do some exploratory disassembly by taking off the passenger front seat and the carpet lining off. I wonder how difficult it is to take off the carpet without damaging it.
 
Discussion starter · #8 ·
Unfortunately some of us (Eg. Australians) are not even given an option to order the car with Focal upgrade.

The prospect of retrofitting is very interesting. I’m aware that some sacrifice will need to be made.

Currently, I’m exploring the option of using that enclosure space originally intended to be used by Focal oem subwoofer and use one of those “under the seat” sub. Like one of these which has built-in amp.

https://www.focal.com/en/car-audio/...ar-audio-kits-solutions/integration/plugplay/amplifiers/bass-enclosures/ibus-21

Otherwise, if my local dealer can order me the original Focal subwoofer part, I also wouldn’t cross the option of installing additional amp.
In the service manual, it looks like they already reserved space for the amp at the rear section of the car.

Image


Sent from my iPhone using Tapatalk
 
Discussion starter · #9 ·
Go buy the Focal Subwoofer / Enclosure from Peugeot directly.


Part Number: 9809351580 ÂŁ175 GBP (Optional nut to install it - 6935A6 ÂŁ1.25)


You can order overseas parts from your local dealer (for example I got a Japanese Domestic Market part only, in the UK)


The reason being, you can install this whole unit perfectly and it includes the subwoofer itself which is a triple voice coil power flower Focal Subwoofer. The Power Flower design is mainly used in their high end Utopia series which says a lot.


Making custom enclosures takes a lot of time, skill and patience - Just the raw materials like wood will end up costing over ÂŁ50. With this, you can mostly plug and play.


The issues I believe you will have is finding somewhere to put the amp and wiring the amp to the subwoofer - it will use a custom plug you will have to chop off and wire directly. Your local audio installers will be able to do it easily though if you aren't capable/comfortable.


You can thank me by taking lots of pics of the bass unit thank you very much... as I am so tempted to buy one myself to retrofit into another car haha :thumb:


Decided to bit the bullet and ordered the bass unit from eurocarcare.net since my local peugeot dealer hasn’t been very responsive.
It’ll take about 1 week to arrive from UK. I’ll take lots of photos for you once it’s arrived ;).
After this, it’ll be another bout of research on the wiring colour coding from the headunit for the amp unit. I’m hoping that the headunit has line output so a line out converter is not needed as it generally reduces quality. I’m tempted to DIY this since my local car audio installers haven’t handled too many Peugeot.


Sent from my iPhone using Tapatalk
 
Discussion starter · #11 ·
The bass unit arrived today! That was a lot quicker than I expected.
As promised here are the photos :)

How do I request mods of this
forum to allow me uploading photos in high res?

Image


Image


Sent from my iPhone using Tapatalk
 
Discussion starter · #13 ·
I also measured resistance with a multimeter. Every pair is reading at 2.4ohm.

How do I wire 3 pairs of cables?

The bass box dimension is at approx 56 x 57 cm. I’m surprised that there is that much space under the seat.


Sent from my iPhone using Tapatalk
 
Discussion starter · #15 ·
6 pins in the plug.

2.4 ohm measured with dc multimeter is generally means the coil is rated at 4 ohm each.

How does one arrange the connection between the 3 coils? Parallel or series all 3?
If putting them in series, it will mean it’s rated at 12ohm while putting them in parallel will mean only about 1.3 ohm? Am I analysing it correctly?

Image


Sent from my iPhone using Tapatalk
 
Discussion starter · #19 ·
That’s a good news.

One of these free weekends, I’m going to take off front passenger seat and check if they have preinstalled the loom by default. It’s quite common for a manufacturer to have a single part for all trims.

I found out that Focal’s “12 way system” is basically consisting of 2FR speakers, 2FR tweeters, 1 center speaker, 2 Rear Speakers, 2 Rear Tweeters, and 1 subwoofer.
But wait, that’s only 10 ways. Where is the other 2?

Well as now we know, the subwoofer is triple coil, so it’s counted as 3 ;).

In a typical car manufacturer’s arrangement for the “premium” system, 1 door speaker and 1 door tweeter are served via a single channel out of the head unit (1 pair of +/-). So 2 channels for FR left and right including tweeters, 2 channels for RR left and right including tweeters, 1 channel for center speaker and 1 channel for the sub.

The center speaker is hardly useful in most car speakers arrangement (e.g. clouding the stereo separation) so I’d leave it out.


Sent from my iPhone using Tapatalk
 
Discussion starter · #27 ·
I found out today the front door tweeters are pioneer which is pretty good but when i detached one tweeter and connected it to the center speaker plug to check if its working but there was no sound though when i connected it, i think it might need to be programmed by peugeot planet but i am.excites to know if the rest of the loom for subwoofer and rear tweeters and amp are there?.....
I found the electrical diagram for both 4 channels version vs 12 channels. Unfortunately from looking at the diagram, it looks like the output and wirings are different.

Link for the 12 channels diagram
TinyUpload.com - best file hosting solution, with no limits, totaly free

Link for the 4 channels diagram
TinyUpload.com - best file hosting solution, with no limits, totaly free
 
Discussion starter · #29 ·
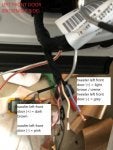
Yes, I think that going to side harnesses is easier (see photo) - less cables. Thick grey and green/yellow are for 12V supply - some other must be for window and lock. Two of them should be for speaker. I started checking cables with multi meter. I will provide update as I move on. No guarantee that inside the door the colors will be the same as outside.
I have completed front door speakers replacement installation last weekend. I figured before I do the hard stuff like installing new amp and sub, I'd do the easy bit first. I'm about to post some install photos but not sure how do you guys upload largish photos as this forum has limited size for files that can be uploaded (97.7kb). Does the file size limit goes bigger once I post more? :)

Here is the wiring colours that I found:
Light Brown/cream, left door front tweeter (+)
Dark Brown, left door front woofer (+)
Grey, left door front tweeter (-)
Pink, left door front woofer (-)

Light Brown/cream, right door front tweeter (+)
Red, left door front woofer (+)
Blue, left door front tweeter (-)
White, left door front woofer (-)

Note that my car is Right hand drive, so left front door is passenger side.

My 5008 is 4 channels version, so the twitter wires were jointed in parallel with the woofer at the woofer's connector. This actually makes the aftermarket crossover installation very easy. I just cut the loom at the woofer socket and use the original wires for the twitter output from the crossover. No need to thread new wires for the twitter like a lot of car installation do.
 

Attachments

Discussion starter · #31 ·


Yes, the blue clip is the hardest
part of the whole install. And taking off the door trim without breaking the fasteners are almost impossible. I ended up breaking 6 out 10 fasteners on my first door and 4 fasteners on other door. Luckily I could get some after marker replacement.

If you do break the fasteners bits, make sure you remember to pick up the broken bits that fell off to the inside of the door or they’ll rattle and drive you insane. I used a long wire with balled up glue at the end to pick up those fallen bits.


Sent from my iPhone using Tapatalk
 
Discussion starter · #32 ·


You need to somehow pry open the edge of the door trim and use some kind of long hook to unlatch the pin by pulling it down. I made the helping tool using a bent coat hanger.


Sent from my iPhone using Tapatalk
 
Discussion starter · #35 ·
The steps of taking the front door trims:
1. Undo the tweeter housing triangle and disconnect tweeter - the housing is secured by 1 plastic fastener on the top and 2 plastic tabs on the bottom, they’re easy to pull off with just bare hand.
2. Pry open the door handle window switches fascia (use a plastic flat tool to slip in between the leather and the plastic and gently pry small section at a time. Then disconnect the connectors.
3. Undo 2 screws just below the handle bar and 1 screw at the bottom center of door trim
4. The most I found difficult: Pry and temporarily lift to create a gap on side of trim so you can see “the blue fasteners” with metal pin. There are 2 of these, Pull these pins down with some kind of hook (check photos above). Perhaps others can share other method. Don’t forget to push the pin back after trim come off so you don’t forget when installing the door trim.
5. Start prying then fasteners from around the edge of door trims. There are total 10 of plastic fasteners. Be prepared to break some of them and don’t panic. I think they’re meant to be disposable anyway. Getting some replacement will be handy.
6. Once the whole trim is open, there is 1 more connector you need to disconnect.
7. You’ll have access to the woofer!


Sent from my iPhone using Tapatalk
 
Discussion starter · #36 ·


A pair of focal ps165f to replace factory woofer.

Image


Check out the depth difference between the factory vs the ps165f. The stock speaker is so light it feels like made of cardboard.
Luckily the door has more than enough clearance to house extra depth without any spacer needed. The factory speaker ring fits perfectly. The only modification needed is drilling extra holes for the screws.


Sent from my iPhone using Tapatalk
 
Discussion starter · #37 ·
Image


I put in some sound deadener on the inside of the door. It’s worth while doing as to be expected Peugeot only stuck in a small square patch of deadener.

I also peeled off the styrofoam waterproof panel that covers the door cavity and replaced it with sound deadener material.

Image


Sent from my iPhone using Tapatalk